
Doing a basic but thorough safety check on your bike before every ride is always a good idea. After all, you don't want to find out something wrong when you're already on the road.
The "M-check" method will help you methodically identify possible problems with your bike memorably. This applies equally to the road, mountain, electric hybrid, and other bikes that have been sitting idle for a long time.

The M-check is a set of check methods designed to address a bicycle's basic safety and performance. Starting from the front hub, moving up along the front fork, then backward, passing through the frame and finally to the rear wheel, drawing the shape of the letter M, you can traverse the main working parts of the bike and complete the inspection of the whole bike. Once you have mastered this method, you can check a bike thoroughly in a couple of minutes. Following is each step of the M-check:
1. Check Front Wheel, Brakes, and Hubs
First, we need to check if the wheelset is securely fastened. The most common way to lock the wheelset on a bike is with a quick release or thru axle. If you are using a quick release on your bike, loosen and open the quick release, press and hold the toggle switch on the quick release and turn the nut on the other side of the quick release until the nut is tight against the fork. Then open the quick release and screw the nut in one more turn. Your wheelset will now be securely locked to the hook and claw of the fork. Placing the bike on the ground while doing this check and adjustment will better ensure the wheelset is centered.
There are many different types of thru axle. Some have a locking structure similar to a quick-release cam lever, and others use threaded locking; they serve the same purpose. The shaft is usually threaded through the entire hub from the fork side and locked to the opposite or rear fork. Before riding, ensure the thru axle is securely locked per the manufacturer's instructions.
Second, turn the wheelset to see if there is a squeaking sound. It may need maintenance or bearing replacement if it sounds like it is turning roughly. As you spin the wheelset, check to see if the brake discs or the brake side of the rims are rubbing against the brake clamps. You will need to adjust the clamps or the entire brake system if it does.

Last, squeeze the brake handle to ensure the brakes are working correctly. If you find that your hydraulic disc brake feels soft, then it may need to be oiled. The hydraulic disc brakes on your new Dolphin need to be oiled regularly. If you are using pull-cord disc brakes and they don't feel as sensitive as they used to, you may need to adjust the tension on the brake lines or replace the brake pads.
2. Check the Tires
The tire needs to be properly mounted on the rim. Check the edge of the tire that is in contact with the rim to ensure that the edge looks even in every place. If there is a problem somewhere, then it needs to be removed and reinstalled. After completing the inspection of the tire mounting, we need to check the tread and sidewalls of the tire in contact with the ground for excessive wear and damage. It is dangerous to use tires that are excessively worn or have damage, such as cracks, and if you find any suspicion or uncertainty about the tires, we recommend replacing them.

For road bike tires, if you notice that some areas have worn flat or where the rubber is starting to come off, the tire must be replaced. For fat tires or mountain bike tires, the tires' bumps will gradually disappear as they wear. If the bulge has worn down very badly, then the tire is no longer usable. You also need to pump the tires to the right air pressure before riding. The optimal tire pressure will be different for different models such as road bikes and mountain bikes, including the different surfaces you are ready to go riding on.
3. Check the Frame
Check the frame to see if there are hairline cracks, and go down the edge to check if the various accessories (such as the water bottle cage) are installed correctly and if there is any noise. Even if there is a tiny hairline crack, you need to have it checked by a professional before riding. If your frame is equipped with a rear shock, check the shock mounting screws to ensure the shock is correctly and reliably installed. You also need to test the shocks to ensure they are working properly.

4. Check Cranksand Pedals
Check if the crank is free to rotate: rotate the crank backward to check if the drivetrain runs smoothly and if the bottom bracket is in good condition. Check the gear plate for damage, missing teeth or excessive wear. An excessively worn tooth is similar in shape to a shark fin. Wiggle the crank to the left and right sides of the bike to check for any resistance or openness in the connection between the crank and the frame. If it feels like there is open volume, it means you may need to replace the center shaft. Turn the pedal, and a well-maintained pedal will only rotate freely with damping because thick lubricated grease will prevent the pedal from rotating.
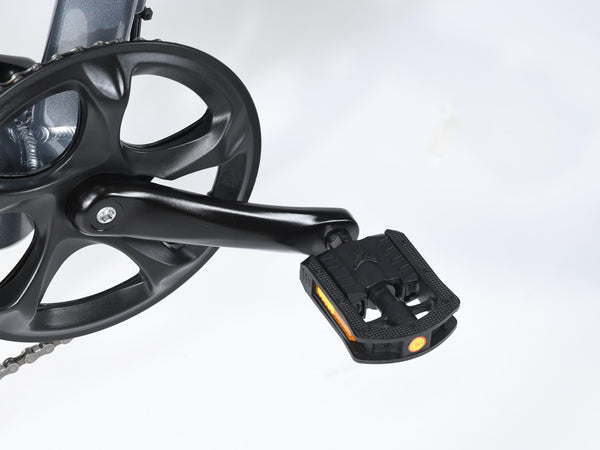
Also, check that the pedals are properly and reliably mounted on the crank. For locking pedals, check if the locking shoe's metal or plastic locking tabs are excessively worn, if the bolts are secure, and if the locking and unlocking forces of the locking pedal match your locking pedal settings.
5. Check the Seat Tube Cushion
There are many small parts on the seat rod clevis, and they can easily move relative to each other and then make a squeaking sound. If so, we need to take apart all the various parts on the seatpost, clean them, lubricate them, and reassemble them.

We need to regularly remove the seat post from the frame for cleaning and maintenance. If you take care of your seat post regularly and properly, your frame will be protected, so don't be lazy and ignore this step. After setting the correct cushion height and reassembling the cushion, we need to check if the cushion is firmly installed on the cushion clevis.
6. Check the Rear Wheels and Drivetrain
Turn the crank to check the chain rotation to ensure no chain links are frozen and cannot turn against each other. Double check each gear of the shifter to make sure that each gear is raised and lowered properly. If using electronic shifting, ensure the battery is fully charged before riding. If there is no indication and you are not sure, it is best to charge it in advance.

Safety should be your top priority, and checking your bike regularly will also help reduce the chances of breakdowns and expensive repairs, allowing you to enjoy the freedom of riding on two wheels. There are many things to check before you go out on your bike, but it only takes a few minutes at a time. When we install the saddle on the seat post battery, we should confirm the bottom battery cable is unconnected; otherwise, we need to loosen it first. And please keep in mind not to use any screwdriver to touch the charge port on the seat post battery in case of electric shock.
